How to set up an Angular2 with ASP.Net MVC in Visual Studio 2015
In this article I am explaining, how we can setting up Angular2 with MVC/WebAPI with in visual studio 2015. There are plenty of free tools(visual studio code, plunker etc...) are available to create Angular applications. But if you want to develop enterprise level multi-layer applications it’s not an easy with in that tools. Then started analyzing how we can develop Angular2 applications with MVC or WEB-API using visual studio 2015. After lots of research, visited lots of angular, .Net forums and followed their instructions, but faced lots of challenges to load an angular page using visual studio MVC. Finally figured out how we can configured Angular stuffs in visual studio after several experiments.
Explaining step by step to
configure and to setting up Angular2 in Visual studio 2015.
1.
If
you don't have visual studio 2015 update 3, please install from the here
2.
Install
NodeJS. Try to install very latest version of node JS from https://nodejs.org/en/
3.
After
completed the installation of NodeJS, you need to install Typings and Typescript. To install the both Run the below commands from the command prompt
a.
npm
install -g typescript
b.
npm
install typings --global (Here '-g' and '--global' means, these two will be
installing in global level, so you can use typings and typescript in every
application)
4.
Next
setup visual studio 2015 to work with NPM correctly. That means how we can tell visual studio to find NPM(node package manager). NPM is a command line interface to manage node.js libraries. Please follow below mentioned steps
a.
In
Visual Studio 2015, open Tools -> Options
b.
Open
the Item 'Projects and Solutions' -> External Web Tools
c.
Add
a new Location of external tools, by selecting the plus button in
the upper right area: (and add these path (where you installed nodeJS) e.g. C:\Program
Files\nodejs
d.
Move
this newly added option to the top of the list, by using the arrows
e. Move $(PATH) option between
“.\node_modules\.bin” and “$(VSINSTALLDIR)\Web\External”
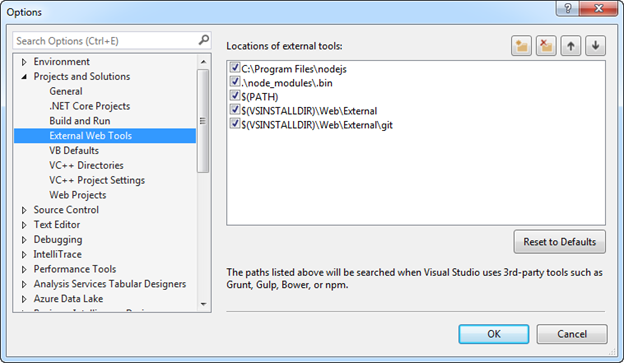
It should now look like this:
5. Once you completed above steps, next
we can jump to creating a MVC application. Either you can using default
template from visual studio or you can create empty MVC application. I
preferred to use default template provide by visual studio. Once you created
MVC application make sure its build/run and launching the index page.
From here, we are going
to configure Angular related libraries in Visual studio.
1. Create a new .json file called package.json your MVC project and add
the following content to the .json file. This file used for download
all the angular related libraries in your MVC project. Its automatically
create folder 'node_modules' and created all libraries inside the folder.
{
"name":
"angularmvc",
"version": "1.0.0",
"keywords": [ ],
"author": "Rajesh Sreenivasan",
"license": "For Learning",
"version": "1.0.0",
"keywords": [ ],
"author": "Rajesh Sreenivasan",
"license": "For Learning",
"dependencies": {
"@angular/common": "2.0.1",
"@angular/compiler": "2.0.1",
"@angular/core": "2.0.1",
"@angular/forms": "2.0.1",
"@angular/http": "2.0.1",
"@angular/platform-browser": "2.0.1",
"@angular/platform-browser-dynamic": "2.0.1",
"@angular/router": "3.0.1",
"@angular/upgrade": "2.0.1",
"angular-in-memory-web-api": "~0.1.1",
"bootstrap": "^3.3.7",
"core-js": "^2.4.1",
"reflect-metadata": "^0.1.8",
"rxjs": "5.0.0-beta.12",
"systemjs": "0.19.39",
"zone.js": "^0.6.25"
}
"bootstrap": "^3.3.7",
"core-js": "^2.4.1",
"reflect-metadata": "^0.1.8",
"rxjs": "5.0.0-beta.12",
"systemjs": "0.19.39",
"zone.js": "^0.6.25"
}
}
2. Once you created the package.Josn, just clean and rebuild
the project, then right click on the package.json
file, click the 'Restore Packages' menu. Look the output window and make sure
there should not be any error related to NPM or something else. If there is NO error, It
will create all required angular libraries into node_modules folder in your MVC project root (open project folder in file explorer to see the node_modules folder). It may take 1 or 2 minutes and you can see
the status in visual studio status bar say "Installing packages complete". Once its installed all libraries, please check the node_modules folder it will have all necessary files and folders. Please DON'T include node_modules
folder in your project file. Since it’s not necessary, but it should keep in the
project root folder.
The node_module folder should have the following folders.

The node_module folder should have the following folders.
3. Now we are going to create systemjs.config.js
file to add angular library reference to the MVC project which is from the node_modules
folder. Add the below code to your systemjs.config.js
/**
* System configuration for
Angular samples
* Adjust as necessary for your
application needs.
*/
(function (global) {
System.config({
paths: {
// paths serve as alias
'npm:': 'node_modules/'
},
// map
tells the System loader where to look for things
map: {
// our app is within the app folder
app: 'app',
// angular bundles
'@angular': 'npm:@angular',
'@angular/core': 'npm:@angular/core/bundles/core.umd.js',
'@angular/common': 'npm:@angular/common/bundles/common.umd.js',
'@angular/compiler': 'npm:@angular/compiler/bundles/compiler.umd.js',
'@angular/platform-browser':
'npm:@angular/platform-browser/bundles/platform-browser.umd.js',
'@angular/platform-browser-dynamic':
'npm:@angular/platform-browser-dynamic/bundles/platform-browser-dynamic.umd.js',
'@angular/http': 'npm:@angular/http/bundles/http.umd.js',
'@angular/router': 'npm:@angular/router/bundles/router.umd.js',
'@angular/forms': 'npm:@angular/forms/bundles/forms.umd.js',
// other libraries
'rxjs': 'npm:rxjs',
'angular-in-memory-web-api': 'npm:angular-in-memory-web-api',
},
//
packages tells the System loader how to load when no filename and/or no
extension
packages:
{
app: {
main: './main.js',
defaultExtension: 'js'
},
rxjs: {
defaultExtension: 'js'
},
'angular-in-memory-web-api': {
main: './index.js',
defaultExtension: 'js'
}
}
});
})(this);
Writing Angular
Components
1.
You
have to create a folder call 'app' in your MVC project
2.
Create
app.component.ts in the app folder and add below code
import { Component, OnInit } from '@angular/core';
@Component({
selector: 'my-app',
templateUrl:
'/app/app.component.html',
styleUrls:
['app/app.component.css']
})
export class AppComponent {
constructor() {
}
}
3. Create an HTML template called app.component.html to display the
content in to the browser.
<h1>My First Angular 2 App with MVC</h1>
<h1>My First Angular 2 App with MVC</h1>
<p>All systems working</p>
4.
You can also create a css to make all styles are in separate file.
Here I created a css file called app.component.css. See the app.component.ts, I mentioned app.component.css in styleUrl
5. Create app.module.ts
in the app folder and add below line of code in app.module.ts file. This module class is used for bootstrap the AppComponent.
import { NgModule } from '@angular/core';
import { NgModule } from '@angular/core';
import { BrowserModule } from
'@angular/platform-browser';
import { AppComponent } from
'./app.component';
@NgModule({
imports:
[BrowserModule],
declarations: [AppComponent],
bootstrap:
[AppComponent]
})
export class AppModule {
}
6. Create main.ts in the app folder and
add these lines of code. main.ts is also used for bootstrap the module.ts.
import { platformBrowserDynamic } from '@angular/platform-browser-dynamic';
import { AppModule } from './app.module';
import { platformBrowserDynamic } from '@angular/platform-browser-dynamic';
import { AppModule } from './app.module';
const platform = platformBrowserDynamic();
platform.bootstrapModule(AppModule);
7.
Next,
we need to create tsconfig.json to
configure typescript and after compiling will generate JavaScript file in es5,
es6 or esNext format. The Here I have used es6 its advanced version of
javascript format. But the disadvantages of es6, it will NOT work in internet
explorer version 11 and below. But it will work in edge, chrome and other
browsers.
{
"compilerOptions": {
"target": "es6",
"module": "commonjs",
"moduleResolution": "node",
"sourceMap": true,
"emitDecoratorMetadata": true,
"experimentalDecorators": true,
"removeComments": false,
"noImplicitAny": false
},
"exclude": [
"node_modules"
],
"compileOnSave": true
}
Note: If you really want to run your Angular2 project in Internet Explorer 11 or below, you should change the target set to es5 in the above .json. And you have to copy index.d.ts file from node_modules/es6-shim to your MVC project route. Otherwise you will get build error related to all angular library.
Once you completed all the above steps.
you should be good to launch your Angular project and launch the AppComponent
page.
Feel free to contact me if u need any support.